Potatoes are a versatile and resilient choice for any urban garden, whether in-ground or in containers. They can be harvested early as “new potatoes” or left to mature for long-term storage.
Planting
- Timing: Plant seed potatoes on or just after the last frost date in your area.
- Soil: Potatoes prefer full sun and loose, acidic soil high in compost. Acidic soil (aim for a pH < 6) helps prevent a common disease called potato scab.
- Method: Use pieces of seed potatoes (called “chits”) that have at least two protruding “eyes”.
- Mound Method: Place tubers 4–6″ below the surface of mounded, loose soil.
- Trench Method: Place tubers 4–6″ deep at the bottom of a trench. You will gradually fill in the trench later as the potato plant grows.
- Spacing: Space tubers 12″ apart in rows 24″ apart to allow for airflow and prevent blight. When trenching the potatoes, consider spacing them further apart to leave space for the extra soil that was dug out.
Maintenance
- Hilling: This is the most important maintenance task. As the stems grow upward, mound more soil against them. This prevents the growing tubers from being exposed to sunlight (which makes them toxic/green), supports the stems, and encourages more potatoes to grow.
- Feeding: Potatoes are heavy feeders; add extra fertilizer during each stage of the hilling process.
Pests and Diseases
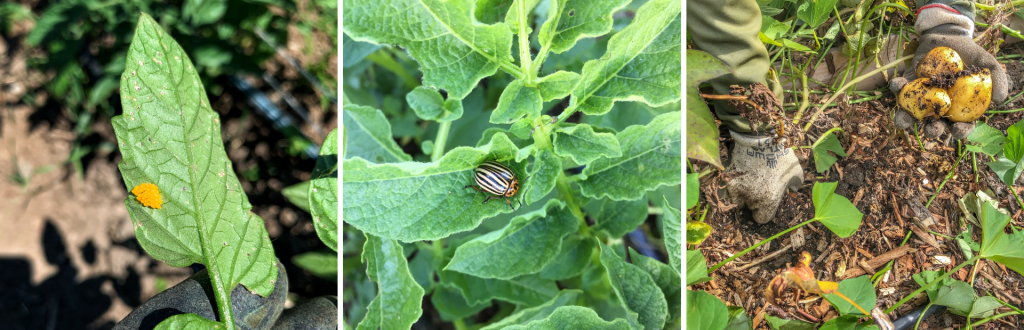
- Potato Beetles: These colourful beetles lay yellow eggs on the leaf undersides (photo on the left, above). The larvae can quickly eat all the leaves; once they are spotted, use diatomaceous earth at the first sign of infestation and check the bottom of all leaves on a weekly basis to scrape off any eggs before they hatch. The centre photo is of a mature potato beetle.
- Blight: Prevent this by ensuring proper spacing for airflow and rotating your crops annually.
Harvesting
- New Potatoes: As soon as the potato flowers begin to die back, use gloved hands to gently search the side of the hill and pull out small tubers as your harvest. See photo on the right, above. These new potatoes have underdeveloped skins so handle these carefully to prevent damage to the skins. Store new potatoes in the fridge.
- Storage Potatoes: Wait until the foliage has died back completely. If the weather is dry, let them “cure” in the ground for 2–3 weeks to harden their skins. Then, gently use a fork to pull away the soil and access the potato cluster. Be careful not to perforate any tubers with the fork – start 6” to the side and work your way inward.
- Storage: For storage potatoes, brush off dry dirt (do not wash) and store in a cool, dark, and airy space.
💡 Tips for Toronto Gardeners 💡
If you are growing in a small backyard or on a balcony, potatoes grow wonderfully in “grow bags” or even directly in the 28L soil bags. This makes “hilling” as easy as rolling up the sides of the bag and adding a few more inches of soil and compost every week as the plant gets taller.
Ready to Grow More?
Join our community of gardeners and start growing your own food in the city! From balcony boxes to backyard plots, community gardens, and urban farms, we’re dedicated to helping you succeed in vegetable gardening and urban agriculture.
- In the Greater Toronto Area (GTA)? Join Our Program at Downsview Park: Enroll in our full-season Grow Veggies program for hands-on learning and a share of the harvest.
- Get Monthly Tips: Sign up for our monthly Grow With Us newsletter to receive seasonal tips and our gardeners’ to-do lists.
- Follow Us: Find us on Instagram or Facebook to see what we’re growing at our teaching garden in Toronto.
