Winter squash, including pumpkins, are productive and resilient plants. While they take up a fair amount of growing space, they hold up well against most pests and weeds. The harvest is highly rewarding because it can be stored for several months.
Planting
- Timing: Winter squash are hot crops. Plant outdoors only when nighttime temperatures stay above 12°C, usually at least 3 weeks after the last frost.
- Method: It is usually best to direct-seed them into the garden, as they grow quickly and squash plant roots dislike being disturbed during transplant.
- Location: Choose the sunniest, hottest part of your garden with plenty of room for vines to spread. If possible, plant squash in an elevated space (raised bed or atop a slope) to reduce the level of powdery mildew.
- Spacing: Plant seeds ¾” deep. Space smaller types (acorn, delicata) 18–24″ apart, and larger varieties (pumpkins) 36″ apart.
Maintenance
- Feeding: Squash are heavy feeders. Start with nitrogen and phosphorus, then move to phosphorus, potassium, calcium, and magnesium later. Top-dress with compost midway through the season to give them an extra boost.
- Watering: Provide extra water on hot days if leaves droop. Once morning dew appears in late July, decrease watering to prevent mildew. Always water using driplines or hand watering and water the soil and not the leaves. Aim to water only in the morning unless the water is intended to cool the plants.
- Pollination: These plants need insect pollinators. Plant native wildflowers nearby to attract them. If fruit fails to develop, try manual pollination every 2–3 days with a small brush.
Pests and Diseases
- Early Pests: Watch for cucumber beetles, squash bugs, and aphids. Use fine-mesh row covers or diatomaceous earth to protect young plants.
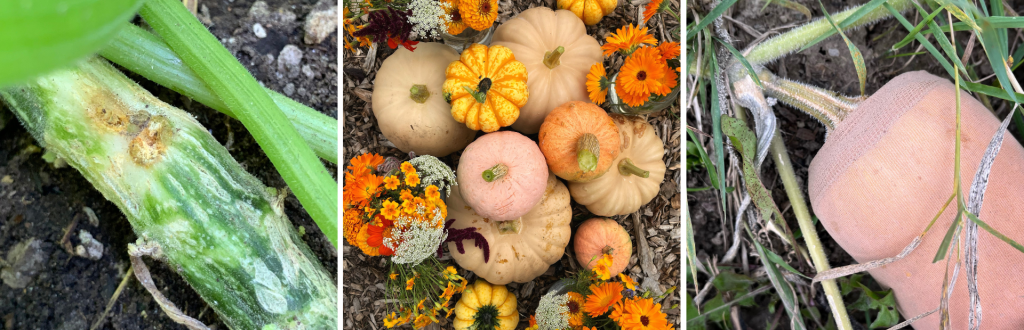
- Vine Borers: Active in early summer; vine borers are moths whose larvae can kill the plant by eating into the vines. The photo on the left shows where the vine borer entered the stem. Protect the base of the plant by wrapping the bottom 6″ of the vine in a stem collar or tin foil.
- Late Stage: Broad leaves are prone to powdery mildew. Always water the soil, not the foliage, and use a baking soda solution if white spots appear. Rodents may also nibble mature fruit in the fall – harvest a little bit early if rodents have discovered your squash and then counter-ripen them.
Harvesting
- Signs of Ripeness: Wait for the fruit to fully ripen for the best flavor. Indicators to look for:
- The colour changes to a darker, matte shade.
- The skin becomes too hard to easily pierce with a thumbnail.
- The stem connecting to the fruit turns yellow and shrivels. In the photo on the right, the stem is half-way between green and yellow.
- Once the squash is ripe, harvest it by cutting the stem 1” above the fruit.
- Curing & Storage: Cure harvested squash fruits in a dry, sunny spot for 1–2 weeks. Afterward, wipe them with a diluted bleach solution to prevent mold and store in a cool, dark place.
💡 Tips for Toronto Gardeners 💡
If rodent damage is a risk, and if the fruits are not too large (e.g., butternut squash or smaller) then, as the fruits start to enlarge, wrap them in nylon ankle socks to reduce the likelihood of rodent nibbling. The butternut squash in the photo on the right is being protected by nylons. The nylons will expand as the fruit grows but are easily removed when the fruit is harvested.
Ready to Grow More?
Join our community of gardeners and start growing your own food in the city! From balcony boxes to backyard plots, community gardens, and urban farms, we’re dedicated to helping you succeed in vegetable gardening and urban agriculture.
- In the Greater Toronto Area (GTA)? Join Our Program at Downsview Park: Enroll in our full-season Grow Veggies program for hands-on learning and a share of the harvest.
- Get Monthly Tips: Sign up for our monthly Grow With Us newsletter to receive seasonal tips and our gardeners’ to-do lists.
- Follow Us: Find us on Instagram or Facebook to see what we’re growing at our teaching garden in Toronto.
