Peppers are a favourite for home gardeners because they are incredibly productive when the weather is right. They are heat-loving perennials that can be brought indoors during the winter to keep them producing for years. Varieties range from mild bell peppers to medium-hot jalapeños and very spicy habaneros.
Planting
- Starting Indoors: Peppers grow slowly and need an early start, typically late February or early March.
- Plant two seeds per 4″ pot about 2-3mm deep.
- Use a horticultural heating pad to maintain an ideal temperature of 25°C for fastest germination.
- Once true leaves appear, keep the strongest seedling and use scissors to thin the weaker seedling.
- Add a mild all-purpose fertilizer every three weeks, starting with once the true leaves emerge..
- Transplanting: Move outdoors only when nighttime lows consistently exceed 10°C. Be sure to “harden off” seedlings for at least a week beforehand.
- Location: Choose a spot with at least 8 hours of sun, preferably including late-day light waves.
- Spacing: Mix 2–3″ of compost into the soil. Space plants 12″ apart (for small varieties) to 18″ apart (for large varieties) in rows 24″ apart.
Maintenance
- Feeding: Use nitrogen and phosphorus-rich fertilizers early on. Once flowering begins, switch to fertilizers with phosphorus, potassium, calcium, and magnesium (like a Bloom formula combined with CalMag or Epsom salt) to improve fruit flavor and quality. Avoid late-season nitrogen, which causes too much leaf growth and fewer peppers.
- Wrangling: Support your plants with stakes or cages. To encourage a bushier, sturdier plant, you can “top” the pepper seedlings once they have 8 true leaves by cutting the main stem just above two healthy sets of leaves.
- Watering: Increase water once fruit appears, but ensure the soil never stays waterlogged.
Pests and Diseases
- Insects: Aphids, hornworms, and potato beetles are common. Use row covers (peppers mostly self-pollinate) or organic treatments like neem oil and diatomaceous earth.
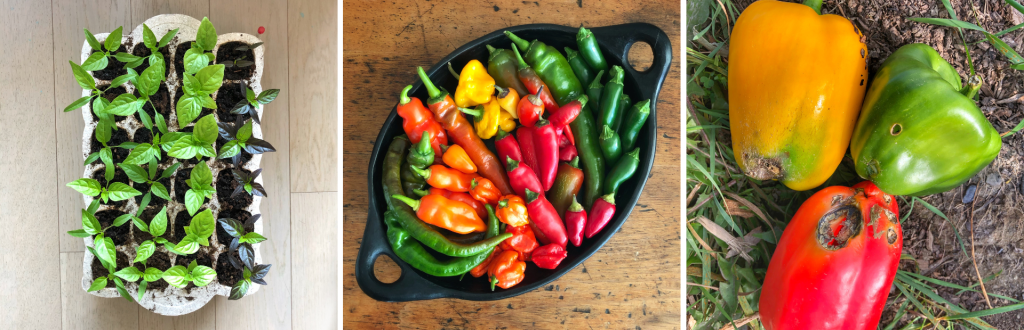
- Pepper Flies: These small yellow flies lay eggs in the fruit from mid-July to early August. The eggs will hatch and the larvae crawl into the pepper fruits, where they feast unbeknownst to the gardener, until the bottoms of the fruits begin to rot. See photo on the right, above. To prevent these, fully cover all peppers plants with fine-mesh netting from early-July through to mid-August so that the flies cannot access the plants to lay eggs.
Harvesting
- Timing: Harvest based on your preference. Green peppers provide a larger total harvest, while allowing them to ripen to red, orange, or yellow offers more flavor and sweetness.
- Technique: Use pruners to cut each pepper fruit at the stem.
- Storage: Peppers stay fresh in a sealed container on the top shelf of the fridge for up to three weeks.
💡 Tips for Toronto Gardeners 💡
For hot peppers, adding sulfur (e.g., add Epsom salt, which is magnesium-sulfate) to the soil as soon as the plants begin to flower will make the peppers more flavourful and also hotter. For bell peppers, consider harvesting the first few flushes of fruit as green peppers before then allowing the fruits to ripen to a red colour. This will provide more overall harvest as the plant will send out more fruits to offset the green peppers that were taken before they ripened.
Ready to Grow More?
Join our community of gardeners and start growing your own food in the city! From balcony boxes to backyard plots, community gardens, and urban farms, we’re dedicated to helping you succeed in vegetable gardening and urban agriculture.
- In the Greater Toronto Area (GTA)? Join Our Program at Downsview Park: Enroll in our full-season Grow Veggies program for hands-on learning and a share of the harvest.
- Get Monthly Tips: Sign up for our monthly Grow With Us newsletter to receive seasonal tips and our gardeners’ to-do lists.
- Follow Us: Find us on Instagram or Facebook to see what we’re growing at our teaching garden in Toronto.
