The upcoming arrival of the growing season means it is time to start planning your vegetable gardening space. Effective planning is the foundation for success, especially when dealing with a short growing season like the one we have in Toronto, Ontario. Follow these four essential steps to create your customized garden plan and maximize your harvest.
1. Select Your Vegetables
Of course, the first step in garden planning is to select your desired vegetables, based on what you like to eat, what has been successful in your garden before, and what else you’d like to try growing. Then, to set your garden up for success, you must first understand their specific growing needs to ensure that it matches with what your garden can provide.
Key Plant Needs to Consider:
- Temperature (Cool vs. Hot Crops): This is critical for managing a short growing season.
- Cool Crops (e.g., peas, spinach): Prefer nighttime lows above 4°C and daytime highs below 25°C.
- Hot Crops (e.g., tomatoes, peppers): Require nighttime lows above 10–12°C to thrive.
- Water Needs: Regular watering or drought tolerance. Always water in the morning so the moisture is available for the plant when the sun is out for photosynthesis.
- Soil Texture and Drainage: Ensure the soil has air pockets. Plants take in much of the oxygen they need through their roots, especially at night. Waterlogged soil literally drowns the plant’s roots, so be prepared to loosen compacted soil, a common challenge with the clay soil we have in the Greater Toronto Area.
- Nutrient Requirements: Heavy, medium, or light feeders.
- Protection: Determine if the plant needs cover from strong winds or morning dew. Tender, broadleaf crops like cucumbers and eggplants often need wind protection.
- Growth Support: Trellising or caging for climbing plants.
(For tips on ordering vegetable seeds, see Ordering Seeds.)
2. Assess Plant Requirements for Your Growing Space
Next step, draw up a simple 4-quadrant grid to classify your selected crops based on their sunlight and soil fertility needs (i.e., full sun vs part shade vs full shade needs and high fertility vs low fertility needs). Of course, this only covers two plant needs, but they’re among the most important and these will help determine whether areas of your garden are a match for your selected vegetables.
With this grid in hand, along with your research of each vegetable plant’s needs, write each vegetable in its appropriate quadrant – for example, tomatoes need full sun and high fertility, spinach needs part shade (preferably morning sunlight only) and low fertility, etc. If you’re using paper, it helps to write your vegetables onto Post-it flags or small Post-in notes for ease of later transferring each vegetable from this grid to your garden plan.

3. Map Your Garden Site and Microclimates
Mapping your entire space—including in-ground plots, containers, and raised beds—is essential for maximizing yield in urban agriculture. This step helps you identify the various microclimates within your space.
Key Elements for Your Site Map:
- Direction: Include a north arrow to accurately estimate sun movement and shade patterns.
- Structures: Buildings, fences, or railings that provide shade or physical support.
- Water Sources/Run-off: Taps, downspouts, and slopes (to identify your main water source and anticipate where water may pool following rain).
- Existing Flora: Trees, shrubs, or flower patches that compete for resources or attract beneficial insects.
- Soil Attributes: Note the soil type (e.g., common clay soil), known compaction areas, and existing fertility levels based on past performance or recent amendments.
- Slopes: These are important to identify areas with good drainage and poor drainage as well as areas that are more susceptible to frost and powdery mildew.
- Access: Garden paths and proximity to your home.

4. Match Plants to Location and Maintenance Zone
This is the optimization stage: move your plant notes onto your garden map, ensuring you match the plants’ needs (Step 2) to each spot’s attributes (Step 3). While you can always add supplements later (compost, irrigation), always use what already exists first.
Key Placement Considerations:
- Support: Trellising crops (e.g., pole beans, cucumbers) must be placed beside existing structures like fences or railings.
- Sunlight Management: Only place vegetables into spots that have the required sunlight or shade levels. Do not try to fit them somewhere they will not thrive. In addition, place shorter crops to the south of taller crops to prevent unwanted shading, unless the shorter plant is a shade-preferring crop like lettuce.
- Permaculture Zoning (Maintenance): Group plants based on how often you need to interact with them.
- High-Touch Crops: Frequently harvested vegetables (lettuce, herbs, spinach) should be placed closer to paths or your house for easy access and monitoring.
- Low-Touch Crops: One-time harvest plants (root vegetables, pumpkins) can be placed in less accessible zones.
- Water Grouping: Group crops with similar water requirements together to simplify irrigation later in the season.
At this point, you may need to reassess your selected vegetables if their growing needs do not align with what your garden can provide. There’s nothing wrong with adjusting your vegetable list if it means your garden is more likely to succeed. Typically, city gardeners will select more full sun plants than their gardens can accommodate, so swapping a few of these out for more leafy greens or herbs will often increase the garden’s productivity.
5. Companion Planting and Crop Rotation Strategy
Now that you’ve come up with a draft garden plan, the final aspect of early garden plFinalize your plan by incorporating plant relationships and a multi-year rotation strategy.
Companion Planting (Friends and Foes): Plants interact in ways that can improve growth, deter pests, and optimize resource use.
- Pest Control: Alliums (onions, garlic, chives) deter carrot rust flies when planted near carrots. Nasturtiums act as a trap crop for aphids, luring them away from valuable vegetables. Marigolds attract beneficial hoverflies that feed on pests. There are so many other examples of pest management crops.
- Growth Forms: Mix above-ground and below-ground growth forms to prevent competition for the same headspace and soil depth. For example, grouping shallow-rooted lettuce with deep tap-root carrots and with tall tomatoes will optimize the use of the entire soil profile and will make your above ground space much more productive.
- Nutrient Cycling: Plant heavy feeders (like tomatoes) next to light feeders (like legumes) to balance soil nutrient depletion.
(For more tips, see our Companion Planting mini guide.)
Crop Rotation: To manage disease and maintain soil fertility, never plant the same crop family in the exact same spot for 3 to 4 years. Pests and diseases are often plant-family-specific and can overwinter in the soil. Rotating crops disrupts the pest lifecycle and ensures different proportions of nutrients are consumed each year, keeping your soil balanced.
6. The Final Result – Putting it All Together
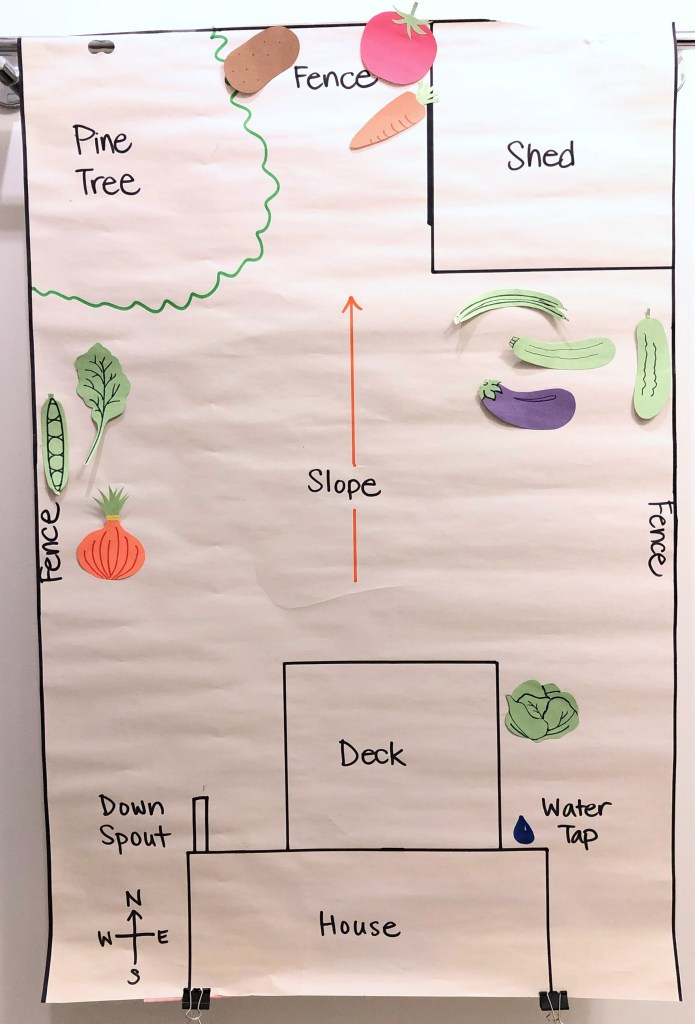
Once you have your garden map drawn, your vegetables selected, and you’ve identified the ideal growing conditions, companions, and previous placements of each vegetable, it’s time to turn this into an actual garden plan. This is an iterative step. It starts with placing each vegetable in the spots in your garden that will provide it with adequate sunlight and fertility levels (using each vegetable’s placement on your grid in step 2). This is where it helps to have the vegetables on Post-it flags, for ease of moving them around. Now, try to optimize things – for example, moving shorter, sun-loving plants in front of taller ones, placing root veggies in sunny places on slopes (or in well-draining spots), etc. This gets you closer to the final plan but continue to move plants around to incorporate companion planting and crop rotation principles. Eventually, voila – you have an optimal garden plan and you can adjust it over time to factor in succession plantings and aesthetic choices. (For tips on later plantings, see our Succession Planting mini guide.)
Here’s a sample that we did at a previous workshop. Your plan can be as simple (like the sample shown here) or as detailed as you like (the plan for our farm is a very detailed Excel spreadsheet).
It doesn’t need to be perfect! Putting in the planning effort now is how you maximize the success of your garden, leading to more fresh vegetables for you and your family.
Ready to Grow More?
Join our community of gardeners and start growing your own food in the city! From balcony boxes to backyard plots, community gardens, and urban farms, we’re dedicated to helping you succeed in vegetable gardening and urban agriculture.
- In the Greater Toronto Area (GTA)? Join Our Program at Downsview Park: Enroll in our full-season Grow Veggies program for hands-on learning and a share of the harvest.
- Get Monthly Tips: Sign up for our monthly Grow With Us newsletter to receive seasonal tips and our gardeners’ to-do lists.
- Follow Us: Find us on Instagram or Facebook to see what we’re growing at our teaching garden in Toronto.
