Food preservation is an invaluable skill for any gardener, preventing your hard-earned yield from going to waste. It’s the best way to savour the fresh taste of summer throughout the long gardening off-season. It also lets you minimize waste after all the hard work in growing your vegetables.
We’re going to walk you through a few different preservation techniques in this article. Designed for urban growers, we’ll focus on practical, kitchen-based storage options since not everyone has access to a dedicated cold room.
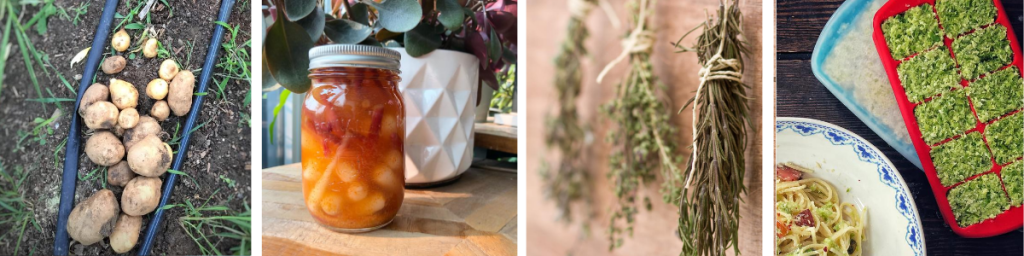
Curing the Harvest
The easiest way to preserve the harvest, curing involves drying the outer skin or rind of certain vegetables to seal and protect the inner flesh, allowing for long-term storage without refrigeration.
Suitable Vegetables: Winter squash, pumpkins, garlic, onions, potatoes, and sweet potatoes.
Steps for Curing:
- Ensure the vegetables are fully mature and free of deep cuts that could prevent proper sealing.
- Most produce (squash, pumpkins, onions, garlic) should be cured in a sunny, airy place. You can spread them out or hang them indoors or in a dry, covered outdoor area.
- Exception: Potatoes require a humid, shady place to cure.
- Turn the vegetables every few days so all sides are exposed to open air.
- Cure for approximately two to three weeks until the skins feel completely dry.
- Once they’re cured, store them in a slightly cool, shady place like a pantry or drawer.
Drying the Harvest
Drying, or dehydrating, preserves food by removing almost all water content, which deprives fungi and bacteria of what they need to spread.
Suitable Vegetables: Herbs and tomatoes.
Drying Herbs:
- Rinse herbs if necessary, then bundle and hang them in a dry, airy place for a week or two until the leaves crumble easily when squeezed.
- For faster drying for teas and spices, you can use a microwave:
- Place herbs on a paper towel and microwave on high in 30-second bursts until slightly crumbly.
- Switch to 10-second bursts until completely dry.
- Be sure that the herbs are completely dry before you store them – any moisture can lead to molding.
- Once they’re completely dry, store them in an airtight container such as a jar.
Drying Tomatoes:
- Slice tomatoes to a uniform thickness (about 1/2 cm to 1 cm).
- Lay slices on a tray to dry in an oven or a food dehydrator. This typically takes 12 or more hours at approximately 65°C (150°F), depending on thickness.
- Once fully dry, store them in sealed freezer bags, airtight plastic containers, or preserved in vegetable oil.
Freezing the Harvest
Freezing is another easy way to save your abundant harvest.
Suitable Vegetables: Herbs, berries, and most vegetables.
Freezing Methods:
- Herbs: Puree them with a little oil or water and freeze in ice cube trays. Alternatively, place whole-leaf herbs (like mint) into a tray, cover with water, and freeze.
- Berries: Lay unwashed berries in a single layer on a baking tray and freeze completely. Once frozen, transfer them to freezer bags or sealed containers for long-term storage. Wash them before use. Note: you can rinse the berries prior to freezing but then make sure they are completely dry before freezing – otherwise the freezing process ruins the texture.
- Most Vegetables: Blanching is required before freezing to help maintain quality and prevent enzyme degradation.
- Boil vegetables for approx. two minutes in rapidly boiling water.
- Immediately cool them in an ice water bath.
- Drain and dry the vegetables completely.
- Place them into freezer bags, leaving a small amount of room for expansion.
Canning the Harvest
Canning involves sterilizing food and storing it in a sterile, airtight environment for months without risk of contamination.
Suitable Vegetables: Most vegetables, but avoid brassicas, summer squash, celery, eggplant, and lettuce.
Important Note: We highly recommend referencing reputable canning resources to ensure you follow safe and tested methods.
- Water-Bath Method: Ideal for high-acid foods (like most fruits, or tomatoes with added acid). Food is placed in sterile jars (with new or nearly-new lids) and submerged in boiling water for a prescribed time to sterilize the contents.
- Pressure-Canning Method: Essential for all low-acid foods (most vegetables) which are more susceptible to pathogens. Jars are placed in a pressure canner for a specific time to reach a high enough temperature for sterilization.
Canning Best Practices:
- Ensure all ingredients and tools are sterile before starting.
- Remove all air pockets from the jars before sealing.
- Leave adequate headspace below the lid.
- If the lid seal fails upon cooling, immediately refrigerate the contents and consume within a few weeks.
Practical Tip: If your preservation goal is large-batch canning of items like tomato sauce, avoid Succession Planting or staggered planting for that crop, as you need a large, simultaneous harvest.
Fermenting the Harvest
Fermentation combines vegetables with liquid and beneficial bacteria to preserve them, enhance flavours, and add health benefits.
Suitable Vegetables: Cabbage, cucumbers, beans, hot peppers, beets, radish, etc.
Basic Fermentation Steps:
- Massage vegetables to help break down cell walls. Slicing them also increases the surface area for bacteria.
- Combine the vegetables with filtered water and salt (and/or a starter culture) in a container.
- Add a weight to ensure all vegetables remain submerged beneath the liquid.
- Leave at least 1” of headspace in the container to allow for expansion and bubbling.
- Cover the container loosely. Do not seal it, as pressure will build up inside.
- Leave the mixture at room temperature until the desired flavour is achieved.
Preservation Tips
Maximizing your yield in a short growing season like ours requires attention both before and during the harvest.
- Harvest in the Morning: Plants do most of their replenishing overnight. Harvesting in the morning results in crisper, longer-lasting vegetables. Keep your harvest cool and shaded immediately after picking to lock in the quality. See our guide on When to Harvest Your Vegetables.
- Add Calcium: When growing your vegetables that you intend to preserve, adding liquid or water-soluble calcium (both of which are immediately available to be taken up by the plants) will help to strengthen the cell walls of your harvest, leading to a crisper, longer-lasting harvest.
- Plan for Long-Season Crops: The short Ontario growing season (100–120 days for hot crops) means crops like tomatoes, peppers, and winter squash may not mature in time for preservation if direct-seeded. Plan to start these long-season crops indoors in March or April and transplant mature seedlings to ensure a good harvest. Consult Starting Seeds Indoors vs Direct Seeding Outdoors and Planting Hot Crops.
- Storage vs. Processing: Decide if you want a large, one-time batch for processing (like canning) or a steady supply for fresh eating. Your decision should influence your initial Garden Planning and Succession Planting strategy.
- Consider Season Extension: For cool crops, you can use methods to keep them in the ground longer, which acts as a form of fresh storage and reduces your preservation workload. See our guide on Extending the Season.
Ready to Grow More?
Join our community of gardeners and start growing your own food in the city! From balcony boxes to backyard plots, community gardens, and urban farms, we’re dedicated to helping you succeed in vegetable gardening and urban agriculture.
- In the Greater Toronto Area (GTA)? Join Our Program at Downsview Park: Enroll in our full-season Grow Veggies program for hands-on learning and a share of the harvest.
- Get Monthly Tips: Sign up for our monthly Grow With Us newsletter to receive seasonal tips and our gardeners’ to-do lists.
- Follow Us: Find us on Instagram or Facebook to see what we’re growing at our teaching garden in Toronto.
