Vegetable gardening in a climate like ours means facing four distinct seasons. For many “tender” perennial crops that grow for years in moderate climates but cannot survive our winters, the only way that they can be perennials here is if they are brought indoors during winter months. By moving them inside, you give them a head start the following spring, ensuring a more established plant and a much higher yield.
Common examples of tender perennials worth overwintering include peppers, rosemary, and pineapple sage.
Why Overwintering is Essential in the GTA
Overwintering a perennial allows it to bypass the slow start from seed in the following year, leading to a more mature plant that will produce much earlier and more heavily. The primary goal during the winter is to induce stasis, or near-dormancy, to conserve the plant’s energy until spring.
Active growth indoors over the cold months is detrimental because:
- Limited Light: Indoor environments, with lower light energy, can cause the plant to become leggy and weak as it stretches for sun. This leads to transplanting an unhealthy and delicate plant into your garden the following spring.
- Wasted Energy: Attempting to flower or fruit indoors consumes valuable energy the plant needs for healthy, productive growth during the next outdoor season.
So, don’t aim for robust growth during the indoor months; rather, keep your plant alive but limit its new growth.
Step-by-Step Guide for Moving Plants Indoors
Moving a plant from your garden plot indoors requires a thorough cleaning process to ensure you do not introduce pests to your home.
1. Prepare the Plant
- Digging: Carefully dig up the plant, leaving a generous margin around the roots to prevent damage and shock.
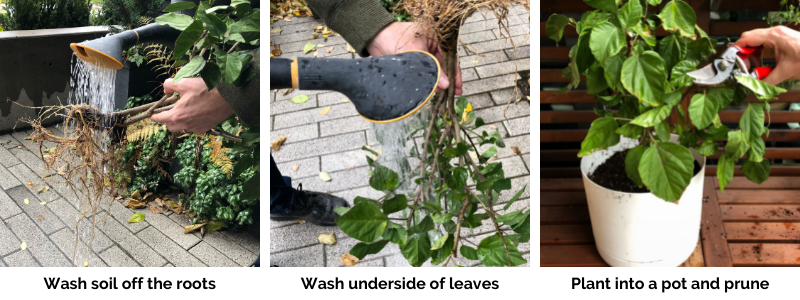
- Prune Foliage: Prune the plant’s top growth by about 50%. This reduces the chance of the plant becoming leggy and significantly limits water loss through excessive leaves while indoors.
2. Clean and Repot
- Pest and Soil Removal: This is the most crucial step. Gently spray the soil off the roots and then hold the plant upside down to spray the undersides of the leaves, where pests like to hide as eggs or larvae.
- Pot Preparation: If you are reusing a container that was outdoors, thoroughly scrub it with soap and water before use.
- Potting Mix: Transplant the cleaned plant into a sterile indoor potting mix. Avoid using outdoor garden soil, especially dense clay soil, as it can harbor pests, disease spores, and retain too much water, which can drown the plant’s roots.
- Pot Size: Choose the smallest pot size that accommodates the trimmed root ball. Minimal soil space prevents the plant from attempting active growth during its indoor stasis period.
3. Treat for Pests
Inspect your plant thoroughly for signs of pests, even after washing. Treat before bringing it inside.
- If you see pests, wipe them away or apply a diluted insecticidal soap solution or neem oil to the leaves and stems.
- For more severe infestations, a small hand vacuum can be used to remove visible pests before applying a spray. Consult our Pest Management guide for treatment details.
Overwintering Care and Stasis
The goal of winter care is to keep the plant alive, not to encourage vigorous growth.
Establishment Period (First Two Weeks)
- Placement: Place the plant in the brightest location possible, such as a south-facing window, or use supplemental grow lights.
- Watering: Keep the soil slightly damp at first, but never soaked, to allow the roots to establish in the new mix. Expect some transplant shock, which may cause some larger leaves to yellow and drop; this is normal and not a failure on your part.
Dormancy Period (Winter)
- Watering: Once the plant has established indoors (after approx. 2 weeks), water minimally throughout the winter. Allow the soil to dry out completely between waterings. This restrictive watering schedule is key to encouraging and maintaining stasis.
- Fertilizing: Do not fertilize during the winter months. Resume fertilizing a few weeks before the planned outdoor transplant date in the spring to encourage fresh growth. For more on feeding your plants, consult What Plant Nutrients Do and How to Fertilize.
- Pest Monitoring: Indoor environments, with lower light and humidity, can be susceptible to common houseplant pests like fungus gnats, spider mites, mealy bugs and whiteflies. Continue to inspect your plants regularly and treat any new infestations immediately using small hand vacuums, spray bottles with neem oil, or even giving the plants a quick spray in the shower.
Once the weather is ideal, transplant these perennials back into your garden – usually 2-3 weeks after the last frost date.
Ready to Grow More?
Join our community of gardeners and start growing your own food in the city! From balcony boxes to backyard plots, community gardens, and urban farms, we’re dedicated to helping you succeed in vegetable gardening and urban agriculture.
- In the Greater Toronto Area (GTA)? Join Our Program at Downsview Park: Enroll in our full-season Grow Veggies program for hands-on learning and a share of the harvest.
- Get Monthly Tips: Sign up for our monthly Grow With Us newsletter to receive seasonal tips and our gardeners’ to-do lists.
- Follow Us: Find us on Instagram or Facebook to see what we’re growing at our teaching garden in Toronto.
